أسلاك سلسلة OX من Autarco RS485

تصف هذه الصفحة الاتصال مع العاكس من سلسلة Autarco OX على الشبكة عبر Modbus-RTU (rs485). بشكل افتراضي، يتم ضبط العاكس على العنوان 1.
تحتوي العواكس OX على منافذ الاتصال التالية:
- COM1: موصل أخضر ذو 4 دبابيس لتسجيل البيانات عبر WiFi/خلوي.
- COM2 و COM3: غلافات كابل وغطاء مع نقاط الاتصال التالية خلفها:
- 2 x اتصالا�ت RJ45
- 1 x كتلة طرفية RS485
خاصةً لـ SmartgridOne Controller، يحدث الاتصال RS485 عبر منفذ 'كتلة الطرف COM2'. هذا محدد في المربع البرتقالي في الصورة أدناه:
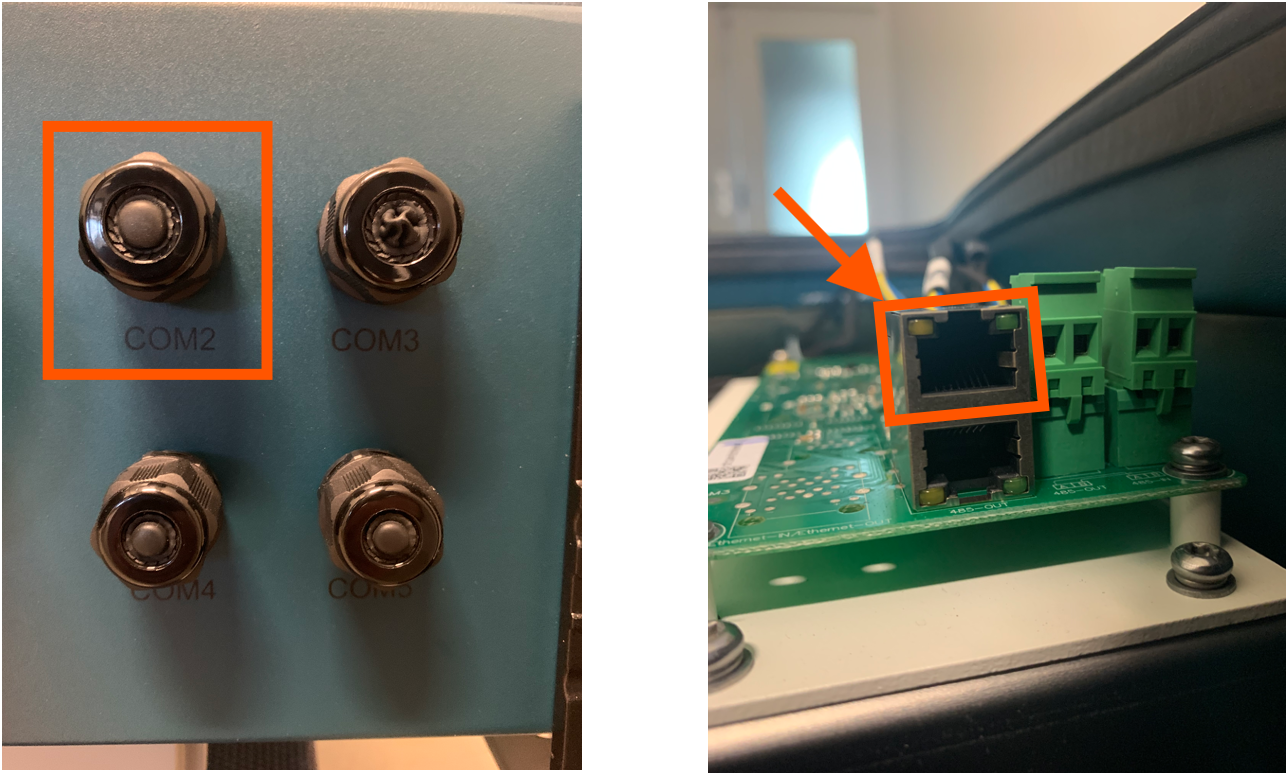
المنفذ هو منفذ RJ45، يستخدم للاتصال RS485. يجب إعداد كابل لربط العاكس بالعاكس.
- أدخل السلك في موصل RJ45 ثم قم بتثبيت الموصل باستخدام أداة التثبيت.
- قم بإزالة صمولة الغطاء من غلاف الكابل المقاوم للماء المسمى COM2 و COM3 في أسفل العاكس. أزل القابس من التركيب.
- أدخل موصل RJ45 في منفذ RJ45 في غرفة صيانة العاكس.
- استبدل صواميل الأغطية لـ COM2/3 واثبتها بإحكام.
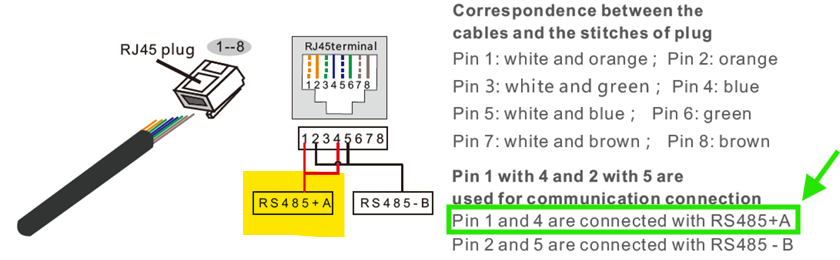
RS485 Wiring
- For correct RS485 wiring: Follow the guidelines for RS485 wiring.
- If the wiring shown in the table below is incorrect, please let us know.
- There is no general consensus in the industry about the usage of A and B for the RS485 polarity, so it may be counterintuitive and opposite of what you might expect for some devices.
| Device | SmartgridOne Controller model OM1 | SmartgridOne Controller model IG8 | RS485-USB converter | RS485-Ethernet converter |
|---|---|---|---|---|
| Pin 3 | RS485 A | RS485_POS | RS485 A | TX+ |
| Pin 4 | RS485 B | RS485_NEG | RS485 B | TX- |
| N/A | RS GND | GND | Not available | G |
NOTE: RS485 Device Addresses
- You MUST give each device on the RS485 bus a unique address. Check the manual of the device on how to do this.
- Use lower addresses first (1, 2, ...) because the SmartgridOne Controller will find them faster!
- For each device, it is generally recommended to stick with the factory default baud rate, parity, and stop bits. The SmartgridOne Controller will scan on those first.