
Contatori di energia Inepro

Dispositivi supportati
| Device Type | Modbus TCP (Ethernet) | RS485 |
|---|---|---|
| Inepro PRO380 | ❌ | ✅ |
Cablaggio
RS485
Info
RS485 Wiring
- For correct RS485 wiring: Follow the guidelines for RS485 wiring.
- If the wiring shown in the table below is incorrect, please let us know.
- There is no general consensus in the industry about the usage of A and B for the RS485 polarity, so it may be counterintuitive and opposite of what you might expect for some devices.
| Device | SmartgridOne Controller model OM1 | SmartgridOne Controller model IG8 | RS485-USB converter | RS485-Ethernet converter |
|---|---|---|---|---|
| A (pin 22) | RS485 A | RS485_POS | RS485 A | TX+ |
| B (pin 23) | RS485 B | RS485_NEG | RS485 B | TX- |
| N/A | RS GND | GND | Not available | G |
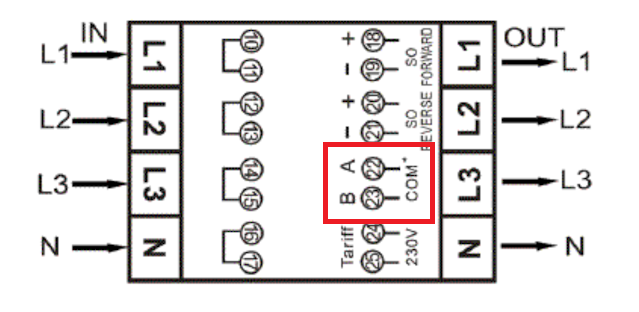
Configurazione
Avviso
NOTE: RS485 Device Addresses
- You MUST give each device on the RS485 bus a unique address. Check the manual of the device on how to do this.
- Use lower addresses first (1, 2, ...) because the SmartgridOne Controller will find them faster!
- For each device, it is generally recommended to stick with the factory default baud rate, parity, and stop bits. The SmartgridOne Controller will scan on those first.
Consultare il manuale del contatore per informazioni più dettagliate sulla modifica dell'indirizzo Modbus. Per impostazione predefinita, il contatore è configurato sull'indirizzo 1. Questo può essere modificato tramite il display del contatore.
- Utilizzare i pulsanti per accedere alla Modalità programma 2.
- Tenere premuto il pulsante destro per 3 secondi per aprire il menu.
- Scorrere fino alla pagina LCD Modbus/M-bus ID (addr xxx).
- Tenere premuto il pulsante destro per 5 secondi per accedere alla modalità di programmazione.
- Il valore inizia a lampeggiare: selezionare 3 cifre (Modbus: 001-247). Confermare ogni cifra tenendo premuti entrambi i pulsanti per 3 secondi.
- Quando l'impostazione viene confermata, sul display LCD viene visualizzato OK.

Last updated December 10, 2025Edit this page